《总之,好记性不如烂笔头!把你遗忘的都记下来吧!》
C++ asio网络编程
基本的asio创建tcp连接流程 终端节点:
终端节点就是用来通信的端对端的节点,可以通过ip地址和端口构造,其的节点可以连接这个终端节点做通信
1 2 3 4 5 6 7 8 9 10 11 12 unsigned short port_num = 3333 ;any ();tcp::endpoint ep (ip_address, port_num) ;"127.0.0.1" ;unsigned short port_num = 3333 ;from_string (raw_ip_address, ec);tcp::endpoint ep (ip_address, port_num) ;
客户端
客户端创建socket的方法:
1、创建上下文io_context 2、选择协议 3、生成socket 4、打开soket
1
2
3
4
5
6
7
8
9
10
11
asio::io_context ioc;v4 ();tcp::socket sock (ioc) ;open (protocol, ec);
客户端创建socket,并通过connect连接指定的对端
1
2
3
4
5
6
7
8
9
std::string raw_ip_address = "127.0.0.1" ;unsigned short port = 3333 ;tcp::endpoint ep (asio::ip::address::from_string(raw_ip_address),port) ;tcp::socket sock (ioc, ep.protocol()) ;connect (ep);
服务端
服务端创建socket,还需要生成一个acceptor的socket,用来接收连接
1 2 3 4 5 6 7 8 tcp::acceptor acceptor (ioc) ;v4 ();open (protocol, ec);tcp::acceptor acceptor (ios, protocol) ;
acceptor绑定bind,并监听listen与接收连接accept
1 2 3 4 5 6 7 8 9 10 11 12 13 14 15 16 17 unsigned short port = 3333 ;any ();tcp::endpoint ep (ip_address, port) ;tcp::acceptor acceptor (ioc, ep.protocol()) ;bind (ep, ec);const int BACKLOG_SIZE = 30 ;listen (BACKLOG_SIZE);tcp::socket sock (ioc) ;accept (sock);
创建acceptor并进行open,bind,listen一气呵成的初始化
1
2
3
4
5
asio::io_context ioc;tcp::acceptor a (ioc, asio::ip::tcp::endpoint(asio::ip::tcp::v4(), 3333 )) ;tcp::socket sock (ioc) ;accept (sock);
async_accept 异步的接收客户端连接
接受一个提供服务的socket,并可以传递回调函数执行回调函数内的逻辑
1 2 m_ac.async_accept (new_session->Socket (),bind (&Server::handle_accept, this , new_session, std::placeholders::_1));
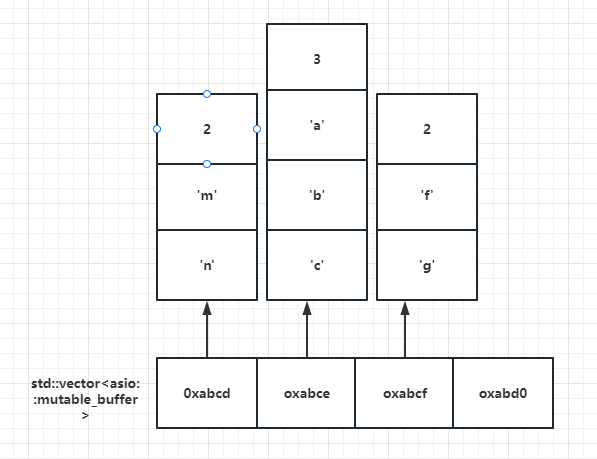
接收和发送缓冲区 任何网络库都有提供buffer的数据结构,所谓buffer就是接收和发送数据时缓存数据的结构。 boost::asio提供了asio::mutable_buffer 和 asio::const_buffer这两个结构,他们是一段连续的空间,首字节存储了后续数据的长度。 asio::mutable_buffer用于写服务,asio::const_buffer用于读服务。但是这两个结构都没有被asio的api直接使用。 对于api的buffer参数,asio提出了MutableBufferSequence和ConstBufferSequence概念,他们是由多个asio::mutable_buffer和asio::const_buffer组成的。也就是说boost::asio为了节省空间,将一部分连续的空间组合起来,作为参数交给api使用。 我们可以理解为MutableBufferSequence的数据结构为std::vector 结构如下
同步读写api 同步写
socket::write_some
可以每次向指定的空间写入固定的字节数,如果写缓冲区满了,就只写一部分,返回写入的字节数。
1
2
3
4
5
6
7
std::string buf = "hello world" ;size_t total_bytes_written = 0 ; while (total_bytes_written != buf.length ()) {write_some (asio::buffer (buf.c_str ()+total_bytes_writtenlength () - total_bytes_written));
soket::send
一次性将buffer中的内容发送给对端,如果有部分字节因为发送缓冲区满无法发送,则阻塞等待,直到发送缓冲区可用,则继续发送完成。
1
2
std::string buf = "Hello World!" ;int send_length = sock.send (asio::buffer (buf.c_str (), buf.length ()));
boost::asio::write
确保发送整个缓冲区的数据。它通常用于确保数据完全传输,需要传递socket。在内部,asio::write 函数通过反复调用低级别的 write_some 函数来实现这一点,直到整个缓冲区的数据都被成功发送。
1
2
std::string buf = "Hello World!" ;int send_length = asio::write (sock, asio::buffer (buf.c_str (), buf.length ()));
同步读
socket::read_some
同步读和同步写类似,提供了读取指定字节数的接口read_some。如果缓冲区中没有数据可供读取,read_some 将阻塞,直到有数据可供读取。
1
2
3
4
5
6
7
8
9
const unsigned char MESSAGE_SIZE = 7 ;char buf[MESSAGE_SIZE];size_t total_bytes_read = 0 ;while (total_bytes_read != MESSAGE_SIZE) {read_some (buffer (buf + total_bytes_read,
socket::receive
可以一次性同步接收对方发送的数据,如果缓冲区中没有数据可供读取,receive 也会阻塞,直到有数据可供读取。
1
2
3
const unsigned char BUFF_SIZE = 7 ;char buffer_receive[BUFF_SIZE];int receive_length = sock.receive (asio::buffer (buffer_receive, BUFF_SIZE));
boost::asio::read
一次性同步读取对方发送的数据,通过多次调用read_some实现,需要传递socket。
1
2
3
const unsigned char BUFF_SIZE = 7 ;char buffer_receive[BUFF_SIZE];int receive_length = asio::read (sock, asio::buffer (buffer_receive, BUFF_SIZE));
异步读写api socket::async_write_some()
async_write_some是异步写的函数,这个异步写函数有两个参数,第一个参数为ConstBufferSequence常引用类型的buffers, 第二个参数为WriteToken类型,而WriteToken在上面定义了,是一个函数对象类型,返回值为void,参数为error_code和size_t, 所以我们为了调用async_write_some函数也要传入一个符合WriteToken定义的函数,
1
2
3
4
5
6
7
8
9
10
11
12
13
14
15
16
17
18
void Session::WriteToSocketErr (const std::string& buf) make_shared <MsgNode>(buf.c_str (), buf.length ());this ->_socket->async_write_some (asio::buffer (_send_node->_msg, bind (&Session::WriteCallBackErr,this , std::placeholders::_1, std::placeholders::_2, _send_node));void Session::WriteCallBackErr (const system::error_code& ec, const std::size_t & bytes_transfered, std::shared_ptr<MsgNode> node) if (bytes_transfered + node->m_cur_len < node->m_total_len) {this ->p_socket->async_write_some (asio::buffer (p_send_node->p_msg + node->m_cur_len, node->m_total_len - node->m_cur_len),[this ,node](const system::error_code&,const std::size_t &bytes_rans){WriteCallBackErr (ec, bytes_trans,node); }
需要注意的问题:
而实际开发的场景用户是不清楚底层tcp的多路复用调用情况的,用户想发送数据的时候就调用WriteToSocketErr,或者循环调用WriteToSocketErr,很可能在一次没发送完数据还未调用回调函数时再次调用WriteToSocketErr,因为boost::asio封装的时epoll和iocp等多路复用模型,当写事件就绪后就发数据,发送的数据按照async_write_some调用的顺序发送,所以回调函数内调用的async_write_some可能并没有被及时调用。
1 2 3 4 WriteToSocketErr ("Hello World!" );WriteToSocketErr ("Hello World!" );
那么很可能第一次只发送了Hello,后面的数据没发完,第二次发送了Hello World!之后又发送了World! 所以对端收到的数据很可能是”HelloHello World! World!
解决方法:定义一个发送队列,使用队列来维护数据的发送顺序
socket::async_send()
异步发送,一次性发送所有数据
1 this ->_socket->async_send (asio::buffer (send_data->_msg + send_data->_cur_len, send_data->_total_len - send_data->_cur_len),std::bind (&Session::WriteAllCallBack,this , std::placeholders::_1, std::placeholders::_2));
boost::asio::async_write()
async_read_some()
1 2 _socket->async_read_some (asio::buffer (_recv_node->_msg+_recv_node->_cur_len, _recv_node->_total_len - _recv_node->_cur_len), std::bind (&Session::ReadCallBack, this ,
async_receive()
1 2 _socket->async_receive (asio::buffer (_recv_node->_msg, _recv_node->_total_len), std::bind (&Session::ReadAllCallBack, this ,std::placeholders::_1, std::placeholders::_2));true ;
boost::asio::async_read()
封装Server和Session管理类 [asio/lecture 05 echo AsyncServer/Session.h at master · haokss/asio (github.com)](https://github.com/haokss/asio/blob/master/lecture 05 echo AsyncServer/Session.h)
处理异步发送乱序问题 [asio/lecture 07 sample package/Session.cpp at master · haokss/asio (github.com)](https://github.com/haokss/asio/blob/master/lecture 07 sample package/Session.cpp)
粘包问题 因为TCP底层通信是面向字节流的,TCP只保证发送数据的准确性和顺序性,字节流以字节为单位,客户端每次发送N个字节给服务端,N取决于当前客户端的发送缓冲区是否有数据,比如发送缓冲区总大小为10个字节,当前有5个字节数据(上次要发送的数据比如’loveu’)未发送完,那么此时只有5个字节空闲空间,我们调用发送接口发送hello world!其实就是只能发送Hello给服务器,那么服务器一次性读取到的数据就很可能是loveuhello。而剩余的world!只能留给下一次发送,下一次服务器接收到的就是world! 如下图
处理粘包
处理粘包的方式主要采用应用层定义收发包格式的方式,这个过程俗称切包处理,常用的协议被称为tlv协议(消息id+消息长度+消息内容),如下图
处理粘包问题的简易方法:
asio处理粘包的简易方式 · 恋恋风辰的编程笔记 (llfc.club)
字节序问题 服务器使用网络字节序 为保证字节序一致性,网络传输使用网络字节序,也就是大端模式。boost::asio::detail::socket_ops::host_to_network_long() 和 boost::asio::detail::socket_ops::host_to_network_short() 函数将主机字节序转换为网络字节序。具体方法如下:
判断本机字节序
1 2 3 4 5 6 7 8 9 10 11 12 13 14 15 16 17 18 19 20 21 22 23 24 25 26 27 28 29 30 31 32 33 34 #include <iostream> using namespace std;bool is_big_endian () int num = 1 ;if (*(char *)&num == 1 ) {return false ;else {return true ;int main () int num = 0x12345678 ;char * p = (char *)#"原始数据:" << hex << num << endl;if (is_big_endian ()) {"当前系统为大端序" << endl;"字节序为:" ;for (int i = 0 ; i < sizeof (num); i++) {int )*(p + i) << " " ;else {"当前系统为小端序" << endl;"字节序为:" ;for (int i = sizeof (num) - 1 ; i >= 0 ; i--) {int )*(p + i) << " " ;return 0 ;
封装逻辑线程处理逻辑功能 protobuf序列化工具 Protocol Buffers(简称 Protobuf)是一种轻便高效的序列化数据结构的协议,由 Google 开发。它可以用于将结构化数据序列化到二进制格式,并广泛用于数据存储、通信协议、配置文件等领域。
1 2 3 4 5 6 7 "proto3" ;1 ;2 ;
客户端发送protobuf序列化消息
1
2
3
4
5
MsgData msgdata;set_id (1001 );set_data ("hello world" );SerializeToString (&request);
服务端接收序列化消息
1
2
3
4
5
6
7
8
9
10
MsgData msgdata;ParseFromString (std::string (_recv_msg_node->_data, _recv_msg_node->_total_len));"recevie msg id is " << msgdata.id () << " msg data is " << msgdata.data () << endl;"server has received msg, msg data is " + msgdata.data ();set_id (msgdata.id ());set_data (return_str);SerializeToString (&return_str);Send (return_str);
json序列化 使用jsoncpp进行序列化,jsoncpp 是一个 C++ JSON 库,它提供了将 JSON 数据解析为 C++ 对象、将 C++ 对象序列化为 JSON 数据的功能。它支持所有主流操作系统
1 2 3 4 5 6 7 8 9 10 11 12 13 14 15 16 17 #include <iostream> #include <json/json.h> #include <json/value.h> #include <json/reader.h> int main () "id" ] = 1001 ;"data" ] = "hello world" ;toStyledString ();"request is " << request << std::endl;parse (request, root2);"msg id is " << root2["id" ] << " msg is " << root2["data" ] << std::endl;
服务器优雅推出 1 2 3 4 5 6 boost::asio::io_context ioc;asio::signal_set signals (ioc, SIGINT, SIGTERM) ;async_wait ([&ioc](auto , auto ) {stop ();
使用调用堆栈查看LogicSystem析构
asio协程 协程更容易处理IO密集型的服务器,因为其协程上下文切换快
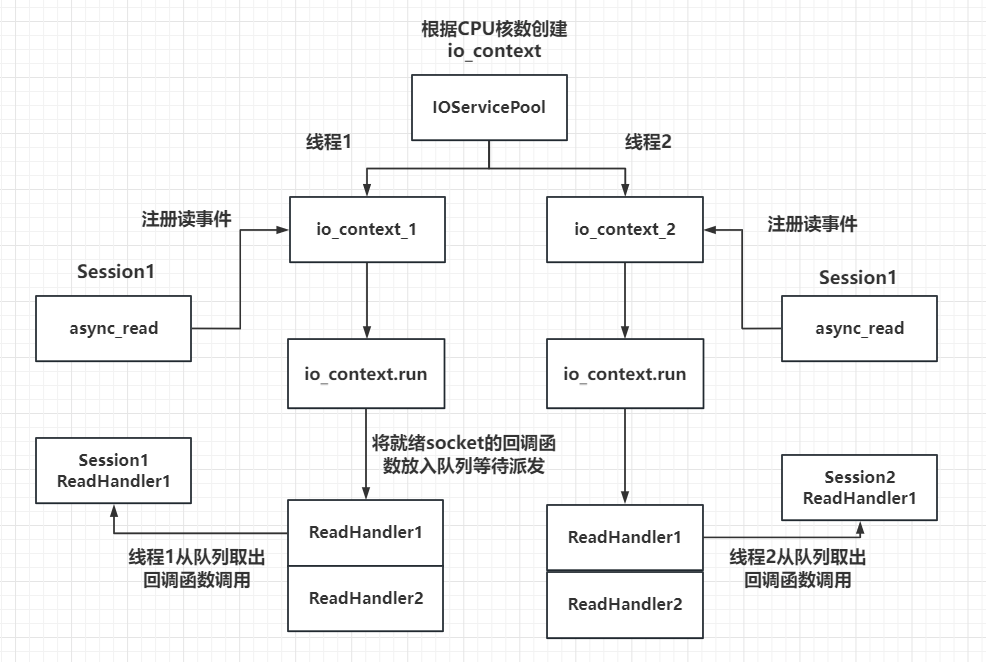
封装IOServicePool
使用beast构建http服务器 [asio/lecture 14 HttpServer/lecture 14 HttpServer.cpp at master · haokss/asio (github.com)](https://github.com/haokss/asio/blob/master/lecture 14 HttpServer/lecture 14 HttpServer.cpp)
使用beast搭建websocket服务器 [asio/lecture 15 Websocket at master · haokss/asio (github.com)](https://github.com/haokss/asio/tree/master/lecture 15 Websocket)
服务器通信grpc 通过grpc可以实现服务器之间的通信
库配置:win10系统 C++环境 安装编译GRPC_windows下grpc安装教程c++-CSDN博客
编译proto文件:
1 protoc.exe -I="." --grpc_out="." --plugin=protoc-gen-grpc="D:\c++_lib\grpc-1.34.0\grpc\visualpro\Debug\grpc_cpp_plugin.exe" "message.proto"
1 protoc.exe --cpp_out=. "message.proto"
定义proto文件
1 2 3 4 5 6 7 8 9 10 11 syntax = "proto3" ;rpc SayHello (HelloRequest) returns (HelloReply) {}1 ;1 ;
Linux网络编程 通过fork函数来创建一个进程副本pit_t fork(void)
对于父进程:fork函数返回子进程ID
对于子进程:fork函数返回0
利用wait 和 waitpid函数来等待进程的结束,防止僵尸进程的产生。
wait是阻塞的等待,而waitpid是非阻塞的等待。
I/O复用 select select 实现 I/O 多路复用的工作原理
文件描述符集 : select 使用 fd_set 类型来存储一组文件描述符。程序使用 FD_SET、FD_CLR、FD_ISSET 和 FD_ZERO 等宏来操作这些集合。监视多个文件描述符 :通过 FD_SET 将感兴趣的文件描述符(如套接字)添加到集合中。然后调用 select,传递这些集合。select 会阻塞,直到其中至少有一个文件描述符可以执行非阻塞 I/O 操作。处理活动文件描述符 :当 select 返回时,遍历文件描述符集,使用 FD_ISSET 宏检查哪个文件描述符有活动(如新连接、可读数据等),然后对这些文件描述符执行相应的操作。
优点 :
可以在单个线程中处理多个客户端连接。
易于理解和使用。
缺点 :
有最大文件描述符数的限制。
当文件描述符数量较大时,性能下降,因为需要线性扫描文件描述符集。
select 每次调用后都需要重新初始化文件描述符集,增加了额外的开销。